
|
DoorStop X Firewall User's Guide Advanced Topics |
 |
|
|
DoorStop X Firewall User's Guide Advanced Topics |
|
DoorStop X fully protects TCP ports, which are used by almost all Macintosh Internet services. There are certain services, however, which use an alternate protocol called UDP. With the significant exception of iChat's screen sharing service, little security will be gained by protecting these services. However, in certain specific situations, there may be some reason to do this. UDP is a relatively simple protocol, but is used for many normal day-to-day Internet operations on the Macintosh, such as:
If there is a specific security advantage in protecting UDP ports on your machine (in particular if you want to protect iChat screen sharing, "Back to My Mac" or Kerberos), choose Preferences from the DoorStop X menu. The preferences dialog appears as shown below in Figure 1.
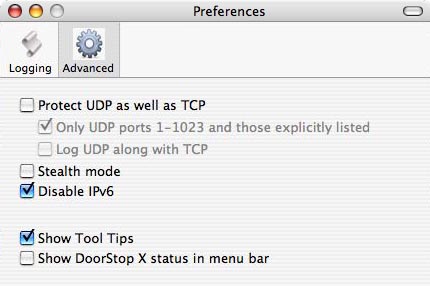
Figure 1. Preferences dialog
To enable UDP protection, click the Advanced icon if it's not already selected, then check the "Protect UDP as well as TCP" checkbox. DoorStop will ask you if you want to create an entry to allow access to the four UDP day-to-day services mentioned above in this section. You should click "Don't add" only if you understand the consequences of doing so. Likewise, if you disable UDP protection, DoorStop will ask if you want delete the entry added previously for the four UDP services mentioned above. You should decline only if you understand the consequences. Note that enabling UDP protection will cause UDP-specific entries to appear in DoorStop's Service Information list.
If you check the "Log UDP along with TCP" checkbox, DoorStop will log UDP access attempts in the same way that it logs TCP access attempts. For example, if in the Logging pane of DoorStop's preferences you have checked "Log denied access" but not "Log allowed access", then DoorStop will log in that way for both TCP and UDP -- if you've checked the "Log UDP along with TCP" checkbox. If you leave the box unchecked, no UDP logging will be done.
In most cases, you will want to protect, by default, only UDP ports 1 through 1023 by checking "Only UDP ports 1-1023 and those explicitly listed." These low-numbered UDP ports are used for standard services, such as DNS, DHCP, Bonjour and NTP (described above). Higher-numbered ports are used dynamically by certain UDP services such as DNS; denying access to most high-numbered ports will effectively disable such services, since there is no way to know ahead of time which ports will actually be used by a given service. If you wish to protect specific high-numbered UDP ports (such as those used by iChat), you can explicitly add entries for them to the protected list.
Once you enable UDP protection, it works much like TCP protection. DoorStop uses exactly the same protected services list for UDP as it does for TCP. Normally a particular service uses either a TCP or a UDP port, but DoorStop will actually protect both types of ports for a given service (if UDP protection for that port is active). The exact details of the protection are specified in the right pane of the Setup window.
One way that UDP protection differs from TCP protection is that UDP is not a connection-based protocol. With TCP, DoorStop can allow or deny just connection attempt packets, and not worry about the packets after the connection has been established. With UDP, DoorStop must allow or deny every packet destined for a particular service. It must therefore not block just incoming connections attempts -- it must block all communications associated with the service.
Additional differences with UDP relate to logging. Since UDP is connectionless, DoorStop will log every single UDP packet to ports that it is protecting (if the appropriate options have been configured through the Preferences dialog and through service-specific logging). You may wish to not log allowed packets if you have enabled UDP protection, due to the number of log entries that could be generated. Regardless, if you've limited UDP protection to ports 1-1023 and those explicitly listed, packets to those ports will be the only ones logged.
Stealth mode (12, Configuring a Personal Firewall)
Although the term "stealth mode" has various meanings, it generally refers to a machine configured to not respond to network events as it normally would. A common example is the blocking of ICMP pings, which are often used by hackers to detect the presence of a machine at a particular IP address. Normally, when a machine receives a ping, it replies to the sender. If the machine does not reply, the sender is led to believe that there is no machine at the IP addresses which they're pinging. Hiding your machine's presence on the Internet is in some ways good from a security standpoint, because if a hacker thinks that your machine is not online, they may not make further attempts to access it. But most hackers are now aware that firewalls can block pings, so blocking them often accomplishes little. Additionally, pings are also used as part of everyday network operations, like verifying that machines on your network are still online. In general, stealth mode should be enabled only by advanced users, and only when absolutely necessary. If it is enabled, blocked ICMP pings are logged if logging of denied access attempts is enabled.
IPv6 protection (6, IP Addresses and Host Names)
IPv6 is the next generation of Internet protocols, with its own addresses and ports. Currently, IPv6 is used mostly by a few universities and certain government projects, and is probably not something you'll need to deal with anytime in the near future. IPv6 can introduce additional security vulnerabilities to your system however, so, similar to an unused service, it should be disabled if not needed. DoorStop X automatically disables IPv6 for you, providing protection against IPv6-based access attempts.
In the rare situation where you need your machine to participate in an IPv6-based network, you can prevent DoorStop from disabling IPv6. Choose Preferences from the DoorStop X menu and click Advanced to get the dialog shown in Figure 1 above. Then uncheck the "Disable IPv6" box. Once this is done, DoorStop X will neither disable IPv6 nor block access to IPv6 services (although to actually configure your machine for IPv6, you still need to use the Network icon within System Preferences). Keep in mind that certain services, such as File Sharing, can work over IPv4 or IPv6, so turning on IPv6 may provide access to those services even with DoorStop X configured to block access to the service.
When moving the cursor over certain parts of DoorStop X's various windows, popups appear with text explaining the function of the particular window item. These popups are called Tool Tips. They are enabled by default, but can be turned off in the Advanced pane of DoorStop's Preferences window by unchecking the "Tool Tips in DoorStop windows" checkbox.
Using the status icon
You can choose to enable a DoorStop status item on the right side of the menu bar, which will be available at all times, even if the DoorStop X application is not running. Using this item, you can quickly:
To enable the status item, go to the Advanced pane of the Preferences dialog (Figure 1 above) and then check "Show DoorStop X status in menu bar". The status icon is shown in Figure 2.
![]()
Figure 2. DoorStop X status icon
With the popularity of portable computers and WiFi (AirPort) hotspots, you may be using your Macintosh in a number of different environments, with different security concerns in each environment. For instance, at work, your whole network may be behind a corporate firewall and you may wish to provide your colleagues with access to a number of services on your machine. At home, however, you may want to provide much more limited access. And in a public WiFi hotspot, such as a coffee shop, you probably want to provide no access at all.
DoorStop X includes a feature called "Locations." A Location is a set of DoorStop protection settings and preferences that are kept together under a specific Location name and can be easily switched to as a group whenever you change your machine's location, or otherwise want to change DoorStop's settings to a previously configured set. In the above example, you would define one Location for work, another for home and another for the hotspot, and switch to the appropriate Location whenever you move your machine.
If you do nothing to set up Locations, DoorStop will include only one, called Default. If you want to switch to a second location, select "New Location..." from the Locations entry in the DoorStop X menu. Give the Location a meaningful name (like "Home") and hit OK. When first created, the new Location uses DoorStop's original protection settings, which block and log all accesses to all TCP services. You can change these settings as normal, and they will apply within the new Location only. Alternately, if you want to base your second Location on your current one, select "Duplicate Location..." from the Locations entry in the DoorStop X menu.
To switch between Locations, select the Location name from the Locations entry within the DoorStop X menu. The switch takes effect immediately. You can also use DoorStop's status icon to switch Locations. The current Location name is always indicated in the title bar of the DoorStop X application (unless there is only one Location).
To edit, rename or duplicate your Locations, choose "Edit Locations..." from the Locations entry in the DoorStop X menu and the following dialog will appear:
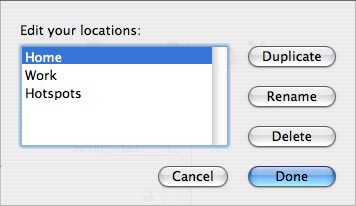
Figure 3. Edit Locations dialog
Select a Location from the list. To create a new Location with the same configuration information as the selected Location, click the Duplicate button. To rename the selected Location, click the Rename button and then edit the name within the list. Or to remove the selected Location from the list, click the Delete button. Click Done to confirm and save your changes.
A few of DoorStop's settings are not kept in Locations and are thus unaffected by changing Location. These include whether DoorStop protection is active or not, log archiving preferences, and whether the status menu item and tool tips are displayed or not. All other settings, including the advanced ones described above, are kept in Locations and change with the Location.
Testing DoorStop X (12, Testing a Personal Firewall)
For added security, you may want to test DoorStop X, to ensure that you've made the proper settings for the services you want to protect. This is done by having another machine attempt to access services on your machine. There are several ways to do this:
Note that third-party security-checking services often report your machine's responses to pings (see "Stealth mode" above) as a security problem. As explained above, however, responding to pings may be needed for normal day-to-day network operations. Unless you understand the ramifications of using stealth mode, you should not enable it, and should not be concerned with the reporting of response to pings as a security problem.
What clients will see
If an access attempt is denied by DoorStop X, the error message displayed on the client will depend on the client application being used. In general the error message will be the same as if the client attempted to connect to a machine on which the desired service was not actually running. For instance the OS X AppleShare client (the Finder's Go -> Connect to Server menu item) will eventually time out and display the message "Connection failed. No response from the server. Please try again." Web browsers will display an error message such as "A connection failure has occurred".
Uninstalling DoorStop X
If you want to turn off DoorStop X's protection, you need only click the Stop button in DoorStop's Setup window. If you wish to remove DoorStop's files from your hard drive, however, you can choose "Uninstall DoorStop X..." from the DoorStop X menu. Doing so will remove files associated with DoorStop, but not the log file or the application folder itself (or its contents). Note that after uninstalling DoorStop, the next time you run it, you will be asked to authenticate, and DoorStop will not be enabled (you can enable it by clicking the Start button in DoorStop's Setup window). After uninstalling DoorStop, you may wish to drag the DoorStop X folder to the trash. Also, if you intend to use another firewall after uninstalling DoorStop, you should confirm the other firewall is actually running and providing protection.
An uninstall option also appears on the DoorStop X splash screen when the evaluation period has expired.
Update information
To see if you're using the latest version of DoorStop X, choose "Update Information" from the "DoorStop X" menu. This will launch your Web browser and take you to the DoorStop X updates page, where you can compare the latest version number with that which you're currently using.
![]() Back to Table of Contents
Back to Table of Contents
![]() Back to Logging
Back to Logging
![]() Forward to Troubleshooting
Forward to Troubleshooting