
|
DoorStop X Firewall User's Guide Protecting Basic Services |
 |
|
|
DoorStop X Firewall User's Guide Protecting Basic Services |
|
The setup window
When you launch DoorStop X, the Setup window will appear, as shown below in Figure 1.
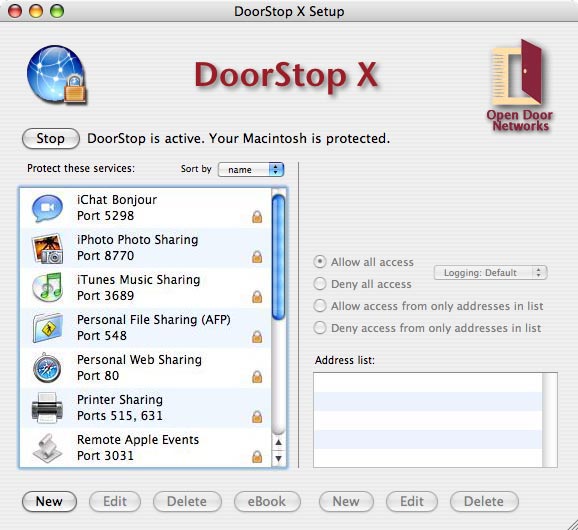
Figure 1. Setup window
At the top of the left pane of the Setup window is the Start/Stop button which turns DoorStop's service protection on and off. Note that turning on DoorStop's protection will not disable TCP connections already made (6, Protocols). For example, suppose you're using DoorStop in its default configuration (which includes blocking all access to File Sharing), but DoorStop is stopped -- users will be able to log into File Sharing. If you then start DoorStop, currently connected users will not be disconnected, but no one else will be able to log in.
Below the Start/Stop button is a list of Internet services. When a service is selected from the list in the left pane, that service's protection is displayed in the right pane, and summarized graphically in the left pane with the following icons:

Deny all access to a service (12, Firewall Basics)

Allow/Deny some access to a service

Allow all access to a service
The services list initially includes only the Internet services built into Mac OS X (for which protection will probably be desired). The list can be sorted by service name (the default) or by port number; sorting is specified using the "Sort by" popup menu above the list. If you wish to protect a service not in the initial list, you must add the service to the list, as described in User-defined Services. Services not displayed explicitly in the services list are protected using the settings for the "All Others" service entry, which for maximum security should be set to deny all access to all services not shown in the list.
In order to provide maximum security, DoorStop by default denies access to all TCP-based Internet services the first time it is started. To allow access to a service, select the service from the service list (the left-hand pane) in the Setup window; if the service is not in the list, you'll need to add it, as described in User-defined Services. With the service selected, use the right-hand pane of the Setup window to specify the desired protection.
You may notice that FTP (port 21) is not present in the service list, even though an FTP server is built into OS X. Open Door chose to omit FTP because, although still popular, it is a very old protocol that has inherent security issues and setup complexities (14, What Is FTP?). Users wishing to share files are much better off using Personal File Sharing or, to share with non-Macs, Windows File Sharing (14, What Can I Use in Place of FTP?).
You may also notice that the iChat service is labeled "iChat Bonjour." This label indicates that only the local-network version of this service is protected. Protecting the Internet-wide version, and in particular iChat's Screen Sharing service, requires enabling UDP protection. See Configuring DoorStop X for iChat.
When protecting a service, you can also indicate specific logging options for that service, although normally DoorStop's default logging options will be sufficient. See Logging for details.
Editing & deleting built-in service entries
Built-in service entries, described in the above sections, can be edited by selecting the entry in the Setup window's services list and clicking Edit, or by double-clicking the entry. A Service Information dialog appears which allows you to edit the name or port list associated with that entry (just as with User-defined Services). Usually you will not want to edit built-in service entries, but in rare cases you may wish to adjust the port list of a built-in service entry, or to change its name.
A built-in service entry can be deleted by selecting the entry from the Setup window's services list and clicking Delete. Deleting built-in service entries makes sense if you expect to never use that service, in which case the service will always be protected using the settings for the "All Others Services" entry. You can add the service back to the list later if needed as described in User-defined Services.
Adding an address to a service's address list
If you decide that you want to deny or allow access to a service from only specific IP addresses (6, IP Addresses and Host Names), you'll need to add those addresses to the address list for that service.
To add an IP address or range of IP addresses to a service's address list, select the service from the services list in the left pane of the Setup window (if the service is not in the list, you'll need to add it, as described in User-defined Services), then click the New button below the address list in the right-hand pane of the Setup window. The New Address dialog appears as shown in Figure 2 below.
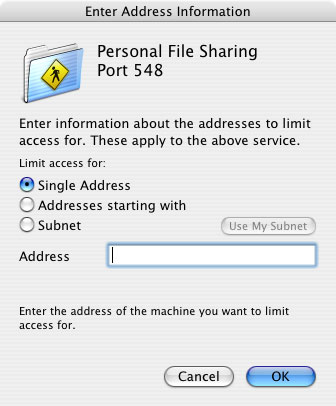
Figure 2. New Address Dialog, limit access for single address
As shown in Figure 2, there are three ways to specify IP addresses
To specify a single IP address, select the "Single address" radio button (the default), enter the address in the Address text box, and click OK.
To specify Addresses starting with, select the "Addresses starting with" radio button, and enter the first one, two or three fields of the address range. When the desired IP address range has been specified, click OK. IP address ranges are useful for allowing or denying access to an entire organization. For instance, Apple Computer could be specified by specifying all IP addresses beginning with "17".
One common technique, useful in intranet and home network environments, is to limit access to a service to users on your subnet. Your subnet is the particular local area network on which your machine resides. Users on your subnet are likely to be more trusted than users on other subnets, or on the Internet, and thus you may wish to grant them access to more services than users in the rest of your organization or on the Internet. A subnet is defined by
For example, an IP address of 192.168.1.101 and a subnet mask of 255.255.255.0 yields a range of 192.168.101.0 through 192.168.101.255.
To specify all addresses on your subnet, choose the "Subnet" radio button and click the "Use My Subnet" button (see Figure 3 below). The IP address and subnet mask in your Network Preferences pane are automatically entered. Click OK when you are done.

Figure 3. New Address Dialog, limit access for subnet
To specify a subnet other than your own, enter an IP address in the Base address box, and a subnet mask in the Subnet mask box, and click OK.
Changing/Deleting an address in a service's address list
As you add addresses to a service, those addresses are added to the service's address list. To change an address in the address list for a service, select the service in the Setup window's services list, select the address in the address list, and then click Edit, or double-click the address. The Edit Address dialog appears, and looks similar to the New Address dialog. Changes are made using the methods described above.
In particular, if you are using your subnet as an address range, and if
you will need to update your subnet address range. Double-click the address range in the Setup window's address list, and click the "Use My Subnet" button. You will need to do this for each service which uses protection based on your subnet's address range. (If you move your machine often, consider using DoorStop's Locations feature to accomplish the same thing).
Changes do not affect connections that are already established. For example, if a user is logged in to your File Sharing and you disallow access to that user, they will remain connected, with access to your files, but once they log out they will not be able to log back in.
To delete an address in the address list for a service, simply select the service in the left pane of the Setup window, select the address to be deleted in the right pane, and click Delete.
Further information about a service
Additional information on the service, and important contextual details, are often available in Internet Security for Your Macintosh. Select an item in the "Protect these services" list in the main window (Figure 1), and then click the "eBook" button below the list. Your default browser will display the relevant entries in the book. See Figure 4.
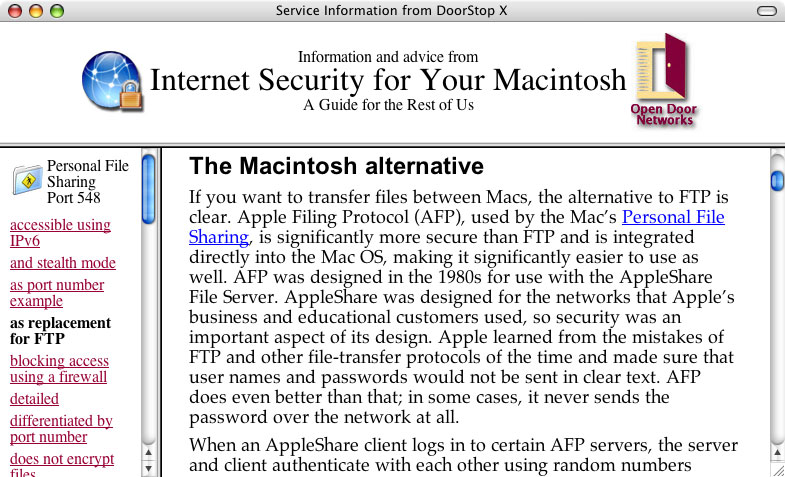
Figure 4. eBook entries on port 548
A list of relevant passages is displayed on the left, with the text of passages displayed on the right. If there is nothing in the book that corresponds to a service, you'll see a list of passages that relate to unknown services. You can also search the book's blog (isfym.com) and Top 10 list for current information on the service. Or visit our Twitter stream for the most up-to-date news.
![]() Back to Table of Contents
Back to Table of Contents
![]() Back to DoorStop X Basics
Back to DoorStop X Basics
![]() Forward to User-defined Services
Forward to User-defined Services