
Envision
the new way to experience the Web
User's Guide - Customizing Content
Envision
the new way to experience the Web
User's Guide - Customizing Content
This section covers modifying the content of a show.
The Envision main window
Figure 1 shows the Envision main window and its controls. Use Figure 1 as a reference throughout this chapter.
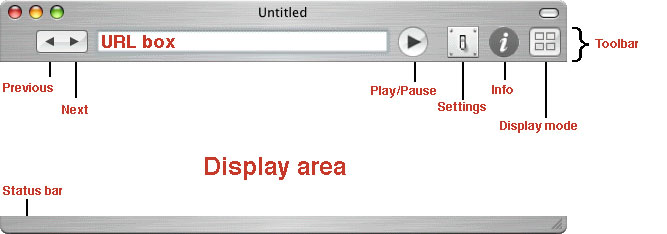
Figure 1. Envision main window
The Settings dialog
Before we get into the specifics of customizing content, we need to look briefly at the Settings dialog, which is used to specify where images should be looked for, and how to select images for display (along with other aspects of shows). To access the Settings dialog
The Settings dialog is divided into panes, allowing for logical grouping of related functions. The first time the Settings dialog is opened for a show, it defaults to the Basic pane, shown below in Figure 2. To select another pane, click the icon in the Settings dialog for that pane. As you look at other panes, note that the Basic pane contains fields that are also presented in other panes. The Basic pane is intended as a way to access Envision's most commonly used settings in one place. Note that some controls are marked "Mac only" -- this indicates that these controls affect the the display of the show in Envision on the Macintosh, but not in iEnvision on the iPhone or iPod touch. For details, see Authoring for iEnvision
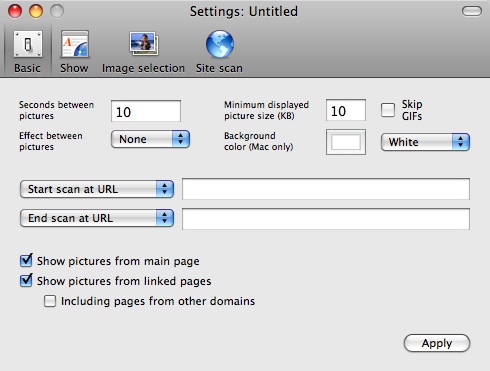
Figure 2. Settings dialog, Basic pane
The default values that appear in the various settings panes can be changed with the Preferences dialog. For example, if you prefer 20 seconds between pictures instead of the factory default of 10 seconds, you can change the default value to 20 seconds by using the Preferences dialog. Any new show subsequently created will default to 20 seconds between images.
How Envision looks for images
Before we talk about customizing content, we also need to talk briefly about how Envision looks for and selects images to download. When you start a show, Envision downloads the page specified by the URL that you entered, and scans the page for images and links to other pages that may contain images. If the page contains links to other pages, Envision then goes to the other pages and scans each of them for images and potentially even other links. By default, Envision only looks for images at this second level, although the number of levels can be changed.
You usually don't want Envision to display every image that it finds. For example, if you're looking at Matisse, you probably don't want to also display images from ads on the Web site where the Matisse images are presented. The methods of controlling content fall into four general categories:
Choose the best page to start from
The most obvious way to avoid unwanted images is to use the URL of the page that is closest to the images of interest. For example, if you've used your browser to go to http://www.cyberrentals.com, and you're only interested in images of properties on Maui, you wouldn't enter http://www.cyberrentals.com, since that page has links to over 40,000 properties from all over the world. Using your browser, you could explore the site a bit more by going first to Hawaii, and once there, to Maui. The Maui page, at http://cyberrentals.com/HI/MAUI.html, has links directly to properties on Maui, and nowhere else, so this would be the URL to use.
NOTE: The images of interest do not need to actually be on the page you choose. In general, however, that page should at least point to pages that contain the images. By default, Envision looks for images at the address you enter and on all pages linked to from that address.
Specify where (and when) Envision looks for images
Once you've specified a good starting place for a Web show, you can further control content by telling Envision where to look for (scan for) images, and when to re-scan. The settings options, described below, are
The following items are found in the Site scan pane of the Settings dialog (Figure 3):

Figure 3. Settings dialog, Site scan pane
Start scan at/after URL - If this field contains a URL, Envision will not start scanning URLs for images until it has hit the specified URL on the main page, or after it has hit it, depending on the setting of the associated popup menu. This, along with End scan at/before URL (below), are good ways to eliminate unwanted images from a show. Eliminating unwanted images in this way can help clean up a show and increase performance. To use this feature
To continue with our example from above, http://cyberrentals.com/HI/MAUI.html, make a new show, enter the URL http://cyberrentals.com/HI/MAUI.html in the URL box, and hit Return. Notice that many extraneous images appear. These result from Envision following links on the specified page that appear before the first property link. To have Envision start with the first property, use your browser to go to http://cyberrentals.com/HI/MAUI.html and then control-click the link to the first property. Copy that URL and paste it into the Start scan at URL box, making sure that the popup is set to Start scan at URL and not Start scan after URL. Click the Apply button and then choose Refresh from the Show menu and Envision will re-scan the page at http://cyberrentals.com/HI/MAUI.html, but won't start looking for images until it has gotten to the link for the first property. Note the first image of the show, a non-property image. This is the poster image, chosen by Envision when the show was first run. For information on the poster image and how to change it, see The poster image.
End scan at/before URL - If this field is not blank, Envision will stop scanning for images once it hits the specified URL on the main page (or before it hits, depending on the setting of the associated popup menu). In the case of http://cyberrentals.com/HI/MAUI.html, once the show runs to completion, notice that at the end there are non-property images displayed. To eliminate these, use your browser to find the last link you want the show to follow, and use the same procedure as for Start scan at/After, only paste the URL into End scan at URL, making sure the popup reads End scan at URL and not End scan before URL. Choose Refresh from the Show menu and Envision will re-scan the page at http://cyberrentals.com/HI/MAUI.html, but won't start looking for images until it has gotten to the link for the first property, and will stop looking for images after it's hit and followed the link to the last property.
End scan after first URL - Choosing this option causes Envision to scan the first URL and then stop.
Only scan URLs that begin with - The URL filter lets you restrict Envision's scan to a specific subpart of a Web site. If a value is entered here, Envision will only scan URLs that match or begin with the value. The URL you enter must begin with http:// -- for example, if you enter http://www.ibiblio.org/wm/paint/auth/matisse then Envision will scan any URL that equals or begins with http://www.ibiblio.org/wm/paint/auth/matisse, such as
but will not scan
Show pictures from main page - If checked, Envision will scan the main page -- the page at the URL entered in the URL box of the toolbar -- for images. If unchecked, images from the main page will be skipped. This can be useful if the main page has links to several pages you want to see, but doesn't itself contain images you're interested in.
Show pictures from linked pages - If checked, Envision will follow links to other pages.
n levels deep - Assumes Show pictures from linked pages is checked. Specifies how many levels of links Envision should follow while scanning. The factory default is 1. Note that selecting more than one additional level for Envision to scan can significantly slow down a Web show.
including pages from other domains - Links on pages may point to other Web sites. Checking this item will cause Envision to scan those other sites in addition to the main site.
Substitute bigger image for thumbnail - If a Web page uses thumbnails (small versions of larger images) to point directly to full-size images, checking this option will cause Envision to download and display the full-size image instead of the thumbnail. The thumbnail must point directly to the larger image, not to a Web page containing the larger image.
Scan image maps - Tells Envision whether or not to follow links contained in client-side image maps. An example of a client-side image map can be seen at http://www.cyberrentals.com/ in the map of the U.S. Notice the links for each of the states. If you had a show that scanned this page, and Scan image maps were unchecked (the default), the links within the image map would not be followed to look for images.
Re-scan - Tells Envision when to re-scan a site. Re-scanning means reloading the page at the initial URL and going through the entire process of looking for images. This is necessary for changes to certain settings, and may be desirable for sites that change their visual content frequently. Choose the desired value from the popup menu.
Specify criteria for the download & display of images
Once you've told Envision where to look for images, you can also specify what types of images to download and display. Doing so not only limits the show to images you want to see, it can also speed up the show by having Envision not download images unnecessarily. The following settings are found in the Image selection pane of the Settings dialog, shown below in Figure 4. Note that some controls are marked "Mac only" -- this indicates that these controls affect the the display of the show in Envision on the Macintosh, but not in iEnvision on the iPhone or iPod touch. For details, see Authoring for iEnvision
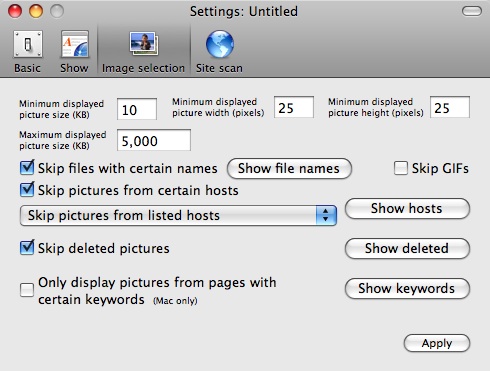
Figure 4. Settings dialog, Image selection pane
Minimum displayed picture size (KB) - Don't display images smaller than the specified size. Minimum picture size, in KB and pixels (see below), are a useful way to eliminate unwanted images, like buttons or advertisements, which usually have smaller images.
Maximum displayed picture size (KB) - Don't display images larger than the specified size. In most cases, Envision will be able to avoid even downloading such images, resulting in potentially faster shows and less disk space usage.
Minimum displayed picture width (pixels) - Don't display images narrower than the specified width.
Minimum displayed picture height (pixels) - Don't display images shorter than the specified height.
Skip files with certain names - Don't download any image whose file name is in the list of filenames to skip. Envision has an editable list of file names that is initialized with names usually used for small and often unwanted images. To get an image's file name, reveal the Info drawer, and copy the name of the image file from the Picture field (not the entire URL, just the file name -- the part after the last "/"). Make sure Skip files with certain names is checked, and click Show file names. Click the Add button, paste in the file name, and click Done. In the Settings dialog, click Apply. From now on, Envision will not download any image file with the name you just specified, for this show only.
Skip GIFs - Don't display any image with the suffix ".gif". Such images are often used in buttons and banners.
Skip pictures from certain hosts - Don't download images from hosts whose name is in the list of hosts to skip. Many sites keep their ad images on commercial sites devoted just to serving ad images. If you see a lot of unwanted images from a specific host (ads.adserver.com), you can add the host name to the list of names to skip. Click Show hosts and add the host name. The host name in a URL like http://ads.adserver.com/yaddayaddayadda is ads.adserver.com -- from after the "//" through the top-level domain (.com, .net, .org, etc). Note that this popup has two other possible values: Skip pictures from all hosts except main one and Display pictures from all hosts.
Skip deleted pictures - Whether or not to skip the pictures in the list of deleted pictures. When you delete an image from a show (discussed below), that image's file name is added to a list of deleted files for that show. Since the whole idea of deleting images from a show is to have them not displayed, Skip deleted pictures is checked by default. If you uncheck it, all deleted images will be displayed along with the rest of the show, although the images remain in the list of deleted files. To manage the list of deleted files, see Un-deleting images below.
Only display pictures from pages with certain keywords - Only download images from pages that contain the keywords you specify. Note that "keywords" in this case refers not just to the KEYWORDS HTML meta-tag, but to any text on the page, visible or not. That is, Envision searches not only the displayed text of a page, but all HTML, including normally-unseen text such as an image's alternate text.
Note that if changes are made in the Image selection pane that cause more images to be displayed than were previously, those images may not appear immediately in thumbnail mode. To be sure you're seeing all thumbnails that correspond to the new Image selection pane settings,
Envision does its best to "guess" as to which images you'd like to see as part of its Web shows, and you can fine tune those guesses as described above. Even so, images may appear in a show that you'd rather not see. If this is the case, you can then delete those images as desired, and they will no longer appear in the show.
Un-delete images in a show
As mentioned above, when you delete a file from a show, that file
name is added to a list of deleted files for that show. To manage
the list of deleted files, go to the Image selection pane of the Settings dialog, and click Show deleted. A list of deleted files appears. To remove a file from the list
permanently, select that file in the list and click Undelete; to undelete all files permanently, click Undelete All.
Note: If you un-delete images and they don't reappear in the show,
use Envision's re-scan function (see below) to force the un-deleted
images to be downloaded again.
Changes to certain settings will not take effect until the site is re-scanned. In particular, new images may not appear in a show after changes have been made to certain settings, until the site has been re-scanned. These settings are all those in the Site scan pane of the Settings dialog, and include
Note that many of these items also show up in the Basic pane of the Settings dialog as well. If you change a setting in the Basic pane, Envision will issue a warning message if the site needs to be re-scanned for the change to take effect. The options for re-scan frequency, specified in the Re-scan item of the Site scan pane of the Settings dialog, include
You might want to use one of the automatic re-scan options for shows based on Web sites with frequently changing content.
 Forward to Customizing Display
 Back to Making a Show
Back to Table of Contents