Envision
the new way to experience the Web
User's Guide - Authoring for iEnvision
Overview
Envision for Macintosh is the easiest way to create and publish the best Web shows for the iPhone. To do this:
- Create a show in Envision and save it to your hard drive.
- Use Envision to export the show to your MobileMe/.Mac account.
- On your iPhone/iPod touch, run iEnvision and import the show from your MobileMe account.
- There are also advanced options for creating and modifying the export list group name and content directly.
Saving shows for iEnvision - Basic
Envision's File menu has the standard Save and Save as... items, which save a show to your Mac's hard drive. To save a show for use by iEnvision on the iPhone or iPod, there is the iPhone menu. The first menu item is Export for iPhone.... Choosing this item brings up a confirmation dialog. If you click OK, the show is copied to your MobileMe account, where it can then be imported by iEnvision.
Saving shows for iEnvision - Advanced
Envision's iPhone menu has two main items:
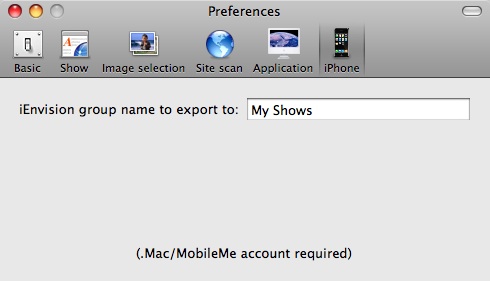
- Export for iPhone... - Choosing this item brings up a confirmation dialog. If you click OK, the show is copied to your MobileMe account, where it can then be imported by iEnvision. In particular, the Envision show file is copied to the folder Web/Sites/iEnvision, on the iDisk volume of the MobileMe user configured into the MobileMe Systems Preferences on your Macintosh. In addition, an index.html file is either created or updated in folder Web/Sites/iEnvision, with a link to the show file you just uploaded (and any other show files you may have uploaded). This index file is like a list of shows that are available to iEnvision for import, and is used by iEnvision when actually importing shows. The group name (used by iEnvision) specified in the index file is taken from Envision's iPhone Preferences pane

Figure 1. Settings dialog, iPhone pane
-
Advanced - This item has three sub-items:
- Rebuild Export List... - This rebuilds the list of shows that can be imported by iEnvision. In particular, Web/Sites/iEnvision/index.html is updated to have links to each Envision show file in Web/Sites/iEnvision. Use this item if you've manually added show files to this folder.
- Clear Export List... - This deletes all files and folders from Web/Sites/iEnvision.
- Show Export List in Finder... - Opens Web/Sites/iEnvision in the Finder, displaying the current export list. You can manipulate the show files in this list directly, but be sure to use Envision to rebuild it when you're done.
Display differences between Envision and iEnvision
Although any show you create with Envision can be viewed on your iPhone or iPod touch, using iEnvision, some shows may look or behave differently with iEnvision than they do with Envision. Certain customization features in Envision are not currently supported in iEnvision, and are marked as such in Envision's user interface with the words "Mac only" or "always on iPhone". These items are all found in the Settings dialog, and include:
Tips on making good Web shows for the iPhone/iPod touch
General
- Keep in mind that iPhone shows will often be viewed over EDGE or 3G, not just WiFi. Also keep in mind that the iPhone is much slower doing things like parsing long HTML pages and displaying images than the Mac. Always test on EDGE if possible, keeping in mind that it is a worst-case scenario.
- Use the iPhone window size options under Envision for Mac's "Window" menu to see what the show will look like on the iPhone.
Image selection
- Look for images that are neither too big in file size (avoid those bigger than 200KB or so), nor too small in resolution (avoid those less than 200x200 or so; 640x480 or so is optimum). Set lower limits to avoid superfluous graphics.
- Uncheck show pictures from main page if you don't need it.
- Use filter URLs where possible to speed things up and avoid undesired images.
- Disable thumbnail substitution if the substituted images are too large.
The show itself
- Usually use Wipe effect between pictures; Dissolve when switching between similar images.
- Usually start shows automatically and only play once through.
- Pick a good interval between images, depending on the content. Often 5-10 seconds, but sometimes more for more complicated content.
- Check to see if the images have good captions (by turning caption display on temporarily); if so, enable captions, otherwise disable them (set to "Never").
- Be sure to set the poster image, usually either to the first image in the show (if the site is static and that first image comes up quickly) or to a standard header or other image from the site.
Site scanning
- For static sites, set re-scan to "Only on request"; for daily changing sites to "Once a day".
- If the Web site uses a number of "next" links between pages, you will need to set the number of levels to scan to be large enough to scan through all the next links. You will also usually want to use the filter URL, mentioned above.
 Forward to Saving & Using Images
 Back to Customizing a Show's Display
 Back to Table of Contents


 Forward to Saving & Using Images
 Back to Customizing a Show's Display
 Back to Table of Contents