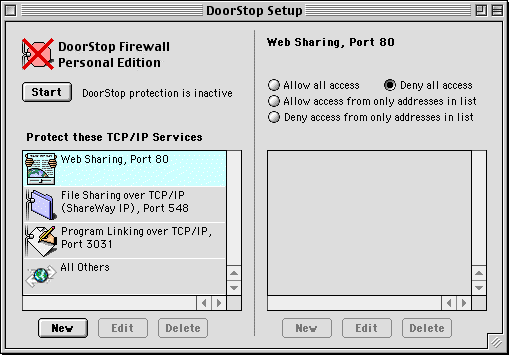
Figure 1. Setup Window, Advanced Mode
DoorStop Admin has two modes of operation: Basic and Advanced. When DoorStop is launched for the first time, by default it operates in Basic mode, which provides the functionality needed to control access to the most commonly used services, in the simplest possible manner.
In Advanced Mode you can
Additionally, the Access History window displays additional information in Advanced mode. To access DoorStop's Advanced mode, choose Preferences from the Edit menu and choose Advanced Mode.
The Setup Window
While in Advanced Mode (see the section above), choose Setup from the Windows menu. The Setup window appears as shown below in Figure 1.

Figure 1. Setup Window, Advanced Mode
Note that the service entries in the left pane include each service's port number. There are three new buttons below the services list in the left pane. These buttons are used to create, edit and delete service entries, allowing you to create protection for services other than those built into DoorStop.
When switching back to Basic Mode, the three buttons under the services list will disappear, as will the port number displays. Any services added in Advanced Mode will still be displayed in the services list, but will not be editable until switching back to Advanced Mode.
The Access History Window
The Access History window has the same functionality in advanced mode is it does in basic mode, but it has several additional fields. The Access History window in advanced mode appears as shown below in Figure 2.
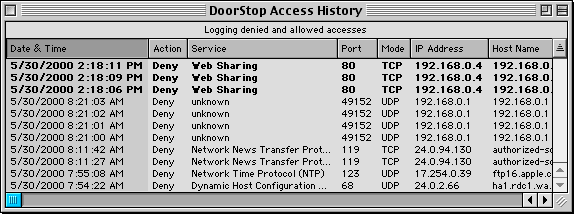
Figure 2. Access History window, advanced mode
| Date & Time | The date and time of the access attempt | |
| Action | Whether the access attempt was allowed or denied | |
| Service | The name, if any, of the Internet service to which access was attempted | |
| Port | The port number to which access was attempted | |
| Mode | The protocol used: TCP or UDP | |
| IP Address | The IP address of the machine from which access was attempted | |
| Host Name | The host name of the machine from which access was attempted |
Lines in bold text are less than 15 minutes old. The Access Information dialog and Export feature are described in the Access History Window section of Using DoorStop - Basic Mode.
To create a new service entry in Advanced Mode, click the New button under the list of services. The New Service dialog appears as shown below in Figure 3.
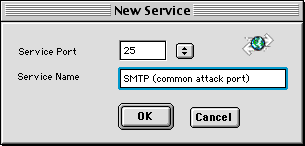
Figure 3. New Service Dialog
Choose a service from the popup list to the right of the Service Port text box, or enter the service's port number directly. If a service does not appear in DoorStop's popup service list, or is using a non-default port, you must know the port number for the service. A list of common port numbers is included in TCP Port Numbers.
Enter a name in the Service Name text box and click OK. The new service appears highlighted in the services list, and has a default setting of "Deny all access". If you wish to use another security setting for the new service, use the radio buttons in the right pane of the Setup window, as described in Changing Access to a Service. If necessary, add addresses, as described in Adding an Address to the Address List.
Editing & Deleting User-defined Service Entries
Predefined service entries cannot be edited or deleted. User-defined service entries, described in the above section, can be edited by selecting the entry in the Setup window's services list and clicking Edit, or by double-clicking the entry. The Edit Service dialog appears as shown below in Figure 4. Note that the port number cannot be changed, but the service name can.
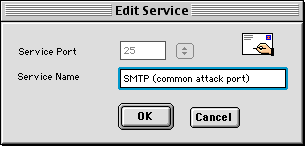
Figure 4. Edit Service Dialog
A user-defined service entry can be deleted by selecting the entry from the services list and clicking Delete.
In addition to changing the service name, the icon, as displayed in the Setup window's service list, can also be changed. To do so:
Working with Subnets
In Advanced Mode, you can allow or exclude access to a service from any subnet which has connectivity to your own.
As in Basic Mode, you can specify your own subnet by clicking the "Use My Subnet" button, or you can specify any other subnet by using the two additional text fields: Base IP Address and Subnet Mask. These fields can be obtained from the TCP/IP configuration information from any machine on the subnet of interest (as displayed in its TCP/IP Control Panel if it is a Mac).
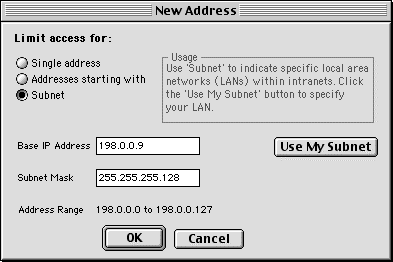
Figure 5. New Address Dialog, limit to any subnet
When the appropriate data has been entered, the Address Range field will display the resulting address range, as shown above in Figure 5.
Self-test
The self-test dialog in Advanced Mode has extended functionality compared with Basic Mode. See Figure 6 below.
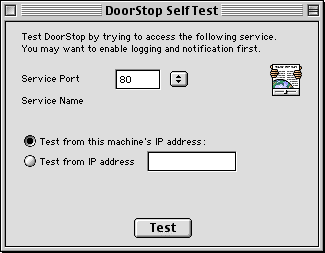
Figure 6. Self-test Dialog, Advanced Mode
The service to be tested can be specified by either entering the port number or using the popup menu. Additionally, a source IP address other than the DoorStop machine can be specified by entering the desired IP address. All other features work as documented in Basic Mode. Note that only TCP services are tested; protection for a given UDP service may or may not be the same as the corresponding TCP service, depending on how DoorStop is configured. Note also that if you are using a PPP connection and your machine is not connected, or if for any other reason your machine does not have an IP address, the "Test from this machine's IP address" button will be greyed out.
DoorStop fully protects TCP ports, which are used by almost all Macintosh Internet services. There are certain services, however, such as the Domain Name Service (DNS), which use an alternate protocol called UDP. In almost all cases, little security will be gained by protecting these services. However, in certain limited situations, there may be some reason to do this. UDP is a relatively simple protocol, but is used for many normal day-to-day Internet operations on the Macintosh. If UDP protection is not configured carefully, normal Macintosh Internet operations can be adversely affected. Most users will not need to use UDP protection.
To enable UDP protection, choose Preferences from the File menu. The preferences dialog appears as shown below in Figure 7.
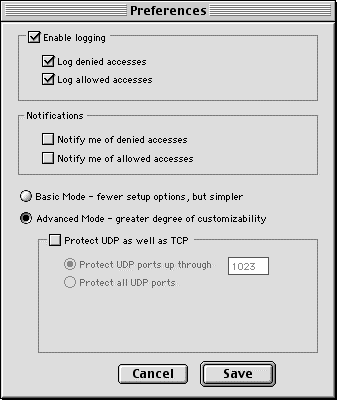
Figure 7. Preferences dialog
To enable UDP protection, click "Advanced Mode", then check the "Protect UDP as well as TCP" checkbox. In most cases, you will want to protect only UDP ports up through 1023. These low-numbered UDP ports are used for standard services, such as DHCP (commonly used to obtain a Mac's IP address) and NTP (Network Time Protocol, which can be used by the Date & Time Control Panel). Higher-numbered ports are used dynamically by certain UDP services such as DNS; denying access to high-numbered ports will effectively disable such services, since there is no way to know ahead of time which ports will actually be used by a given service.
Once you enable UDP protection, it works much like TCP protection. DoorStop uses exactly the same service list for UDP as it does for TCP. Normally a particular service uses either a TCP or a UDP port, but DoorStop will actually protect both types of ports for a given service (if UDP protection for that port is active). The exact details of the protection are specified in the right pane of the Setup window.
One way that UDP protection differs from TCP protection is that UDP is not a connection-based protocol. With TCP, DoorStop can allow or deny just connection attempt packets, and not worry about the packets after the connection. With UDP, DoorStop must allow or deny every single packet destined for a particular service. It can thus not block just incoming connections attempts -- it must block all communications associated with the service.
Additional differences with UDP relate to logging and notification. With TCP, even if no service is active on a particular port, DoorStop is notified of access attempts to that port and can log those access attempts. In general DoorStop is not notified of access attempts to UDP ports that are not active, and thus will not log or notify on those attempts, nor will the attempts be included in the Access History window. Finally, since UDP is connectionless, DoorStop will log and notify on every single UDP packet for active ports that it is protecting (if the appropriate options have been configured through the Preferences dialog). You may wish to not log allowed accesses if you have enabled UDP protection, due to the number of log entries that could be generated.
Even if you only protect lower-numbered UDP ports, you will probably want to create specific entries for certain services. For example, if your machine uses DHCP to get its IP address, you may wish to specify "allow all" (or "allow from addresses in list", and enter the DHCP server's IP address) for the DHCP service, port 68. An entry for this service is automatically created by DoorStop when you enable UDP protection, and for maximum security, access to this service is initially set to "Deny all". A list of common UDP ports is found in the Appendix.
![]() Back to Table of Contents
Back to Table of Contents
![]() Back to Using DoorStop - Basic Mode
Back to Using DoorStop - Basic Mode
![]() Forward to Troubleshooting
Forward to Troubleshooting