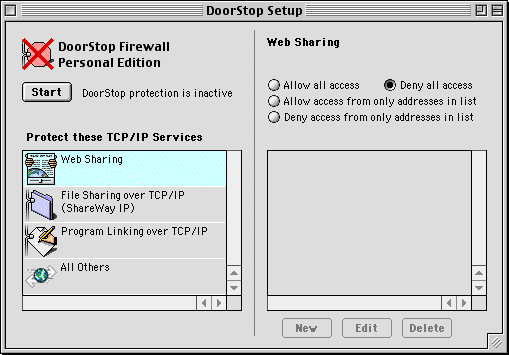
Figure 1. Setup Window, Basic Mode
The Setup Window
To configure DoorStop, launch the DoorStop Admin application. If the Setup window is not displayed, choose Setup from the Windows menu. The Setup window is shown below in Figure 1.
Figure 1. Setup Window, Basic Mode
Figure 1 shows the Setup window in Basic Mode (the default). Additional functionality is available in Advanced Mode. Details on using Advanced Mode are covered in Advanced Features.
At the top of the left pane of the Setup window is the start/stop button which turns DoorStop's service protection on and off. Below the start/stop button is a list of TCP/IP services. Note that Program Linking over TCP/IP will only be displayed on Mac OS 9 machines, since it is not supported on previous systems. When a service is selected from the list in the left pane, that service's protection is displayed in the right pane. In Basic Mode, the services list includes Internet services built into the Mac OS (for which protection will probably be desired). Services that do not show up explicitly in the services list are protected using the settings for the "All Others" service entry, which for maximum security should be set to deny all access.
Note that DoorStop protects TCP/IP services, but not AppleTalk. AppleTalk services are not accessible over the Internet.
In order to provide maximum security, DoorStop by default denies access to all TCP/IP services the first time it is started. To allow access to a service, select the service in the left pane of the Setup window, then choose one of four access options, using the radio buttons in the right pane. For instance, to allow access to a service from all machines, select the service from the services list in the left pane, then click the "Allow all access" radio button. With this option, there are no restrictions on access to the service -- any machine with IP connectivity to your machine can access the service.
To deny access to a service from all machines, select the service in the left pane of the Setup window, then click the "Deny all access" radio button. With this option, no machine will be able to access the service.
To allow or deny access to a service from specific machines, select the service from the services list in the left pane, then click the "Allow access only from addresses in list" or "Deny access only from addresses in list" radio button, respectively, and then specify one or more client machine IP addresses to be used, as described in the next section.
Note that changes do not affect connections that are already established. For example, if a user is logged in to your Personal File Sharing and you disallow access to that user's IP address, they will remain connected, with access to your files, but once they log out they will not be able to log back in.
Note: The "All Others" service entry protects all services which do not have explicit entries in the service list. For maximum security, it is recommended that the "All Others" service entry be set to "Deny all access", and that access be granted only to those services requiring it.
Adding an Address to a Service's Address List
One way of protecting a TCP/IP service is to allow or deny access to it from specific machines on the Internet. DoorStop displays IP addresses in its address list, but machines can be specified either by IP address or by host name.
To add an IP address or range of IP addresses to a service's address list, select the service from the services list in the left pane, then click the New button below the address list. The New Address dialog appears as shown in Figure 2 below.

Figure 2. New Address Dialog, limit access for single address
As shown in Figure 2, there are three ways to specify IP addresses. To specify a single IP address, select the "Single address" radio button (the default) and enter the address in the IP Address text box. If you wish to specify a host name instead, click the "Find..." button. The "Find IP Address" dialog appears as shown below in Figure 3.
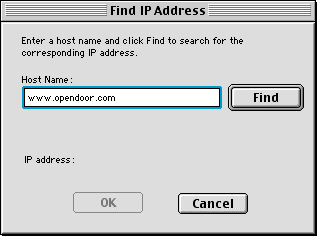
Figure 3. Find IP Address Dialog
Enter the host name and click Find. Once the host name has been looked up, the IP address appears in the "IP address" field. Click OK to dismiss the Find dialog and paste the IP address into the "IP Address" field of the "New Address" dialog. When the desired IP address has been specified, click OK.
To specify a range of IP addresses, select the "Addresses starting with" radio button, and enter the first one, two or three fields of the address range. As you type, the "Address Range" field below shows the range represented by what you have typed in (see Figure 4 below). The Find button is available, as with specifying a single IP address. When the desired IP address range has been specified, click OK. IP address ranges are useful for allowing or denying access to an entire organization. For instance, Apple Computer could be specified by specifying all IP address beginning with "17", and Open Door by all addresses starting with "198.68.10".

Figure 4. New Address Dialog, limit access for range of addresses
One common technique, useful in intranet environments, is to limit access to a service to users on your subnet. Your subnet is the particular local area network on which your machine resides (ADSL or cable-modem-connected users generally will not use this technique, since no other machines reside on their LAN). Users on your subnet are likely to be more trusted than users on other subnets, or on the Internet, and thus you may wish to grant them access to more services than users in the rest of your organization or on the Internet.
To specify all addresses on your subnet, choose the "Subnet" radio button and click the "Use My Subnet" button (see Figure 5 below). Once the "Use My Subnet" button has been clicked, the OK button will become active and the "Address Range" field of the New Address dialog will display the IP address range for your subnet. Click OK when you are done.
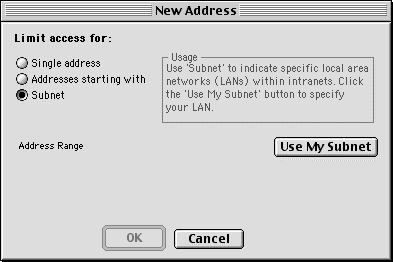
Figure 5. New Address Dialog, limit access for subnet
Changing/Deleting an Address in a Service's Address List
To change an address in the address list for a service, select the service in the Setup window's services list and then select the address in the address list. Click Edit, or double-click the address. The Edit Address dialog appears, and looks similar to the New Address dialog. Changes are made using the methods described above.
In particular, if you are using your subnet as an address range, and if
you will need to update your subnet address range. Double-click the address range in the Setup window's address list, and click the "Use My Subnet" button. You will need to do this for each service which uses protection based on your subnet's address range.
As mentioned previously, changes do not affect connections that are already established. For example, if a user is logged in to your Personal File Sharing and you disallow access to that user, they will remain connected, with access to your files, but once they log out they will not be able to log back in.
To delete an address in the address list for a service, simply select the service in the left pane of the Setup window, select the address to be deleted in the right pane, and click Delete.
DoorStop displays the most recent activity in its Access History window. To display this window, choose "Access History" from the Windows menu. This window displays all access attempts which cause log lines to be generated, as shown below in Figure 6.
NOTE: If logging is not enabled for allowed and/or denied accesses, no new lines will be displayed. Note that the status of logging is indicated at the top of the Access History window.
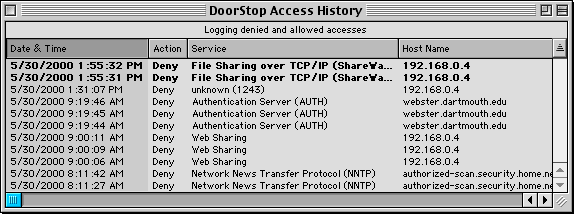
Figure 6. The Access History Window
| Date & Time | The date and time of the access attempt | |
| Action | Whether the access attempt was allowed or denied | |
| Service | The name, if known, of the Internet service to which access was attempted. If the service's name is not known, its port number is included in parentheses. | |
| Host Name | The host name of the machine from which the access attempt was made. If the host name is not known, the machine's IP address is displayed. |
Lines in bold text are less than 15 minutes old, and are automatically scrolled to as they appear. By default, lines are sorted by date, with the most recent lines on top. Sorting by other columns can be specified by clicking the column header; the header in dark gray is the one currently used for sorting. The sense of the sorting (ascending or descending) can also be changed by clicking the sorting triangle to the right of the column headers.
Double-clicking a line, or selecting the line and choosing "Get Info..." from the Edit menu brings up the Access Information dialog, which contains more details on the line. See Figure 7 below.
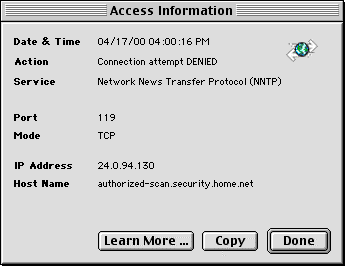
Figure 7. Access Information dialog.
Clicking the "Learn More..." button will tell your Web browser to go to Open Door's "DoorStop 'Learn More'" Web site, which will
Use the Copy button to copy the access information to the clipboard, for use by another application.
The contents of the Access History window can be exported to a tab-delimited text file by choosing "Export..." from the File menu while the Access History window is open.
DoorStop's logging feature allows you to create a log of all allowed accesses through DoorStop, all denied accesses, or both. The log file is useful to see who has attempted to access what services, and spot possible security violations. See also Notification below. Also, note that logging must be enabled before new lines will appear in the Access History window. Logging is enabled by default for allowed and denied access attempts.
From the File menu choose "Preferences". The Preferences dialog appears as shown below in Figure 8.
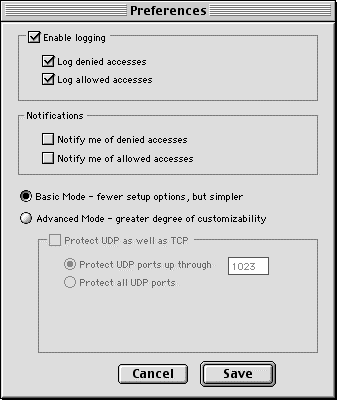
Figure 8. Logging & Notification Dialog
To enable logging, check the "Enable Logging" checkbox. Once enabled, you can use the two subsidiary checkboxes to log only denied accesses, only allowed accesses, or both. With logging enabled and neither subsidiary checkbox checked, the only things logged will be the enabling and disabling of DoorStop, and logging itself. The log file is a tab-delimited text file located in the Preferences folder, and is named "DoorStop Log". The tab-delimited format allows importing the log file into a spreadsheet for analysis. The full log file format is discussed in the Log File Format Appendix.
Logging and service protection are independent of one another. For example, if you are logging allowed accesses and then make DoorStop inactive, DoorStop will continue logging and will, in fact, log all accesses, since all accesses are allowed.
To start a new log file (if the current log file is getting too big, for example)
NOTE: If the log file is renamed or moved while logging is enabled, DoorStop will continue to log to that file until logging is disabled or the machine is restarted, at which time a new log file will be created in the Preferences folder.
See How to Read the Log File in the Appendixes for details of how to use DoorStop's log file to spot possible security violation attempts. To get further information on an IP address or port number in the log file (or in a notification alert), use DoorStop's Access History window. Also, DoorStop's log file can be processed by Open Door's LogDoor Real-time Server Monitor 2.2. For details, see the DoorStop and LogDoor 2.2 appendix.
For immediate feedback to the user, DoorStop can beep and put up an alert every time it allows an access, denies an access, or both. From the File menu choose "Preferences". The Preferences dialog appears as shown above in Figure 8. In the notifications section, choose notification for denied accesses, allowed accesses, or both. Notification is independent of logging.
DoorStop's notification alert, as seen with Mac OS 9, is shown below in Figure 9. It will appear slightly differently with previous versions of the Mac OS.
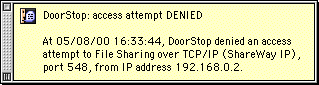
Figure 9. DoorStop Notification Alert (Mac OS 9)
The alert contains details of the access attempt. If the access attempt seems suspicious, consult the Access History window (you will have to have enabled and configured DoorStop's logging feature). To get further information on the access attempt, double-click its line in the Access History window.
The notification of further access attempts will not occur until the current notification alert is dismissed. Note also that with pre-OS 9, processing in other applications may be suspended until the alert has been dismissed. It is recommended that you not use unattended notification with pre-OS 9 if other applications are active.
With DoorStop's self-test feature, you can check that DoorStop is operating and even test the protection of specific services. To use self-test, choose Self Test from the Windows menu. The Self Test dialog is shown below in Figure 10.
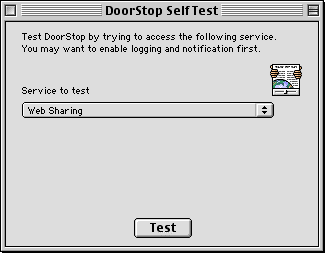
Figure 10. Self Test Dialog
Choose a service from the popup list. When the Test button is clicked, DoorStop Admin simulates a TCP connection to the machine on which it is running, triggering DoorStop and activating DoorStop's logging and notification features, if enabled. For instance, if DoorStop denies the access, and logging and notification of denied accesses is enabled, a log line will be written to the log file and displayed in the Access History window, and a notification alert will be posted. The actual protection of the specified service is also displayed in the self-test dialog (based on the IP address of the DoorStop machine, which is the one making the access attempt). Note that if DoorStop protection is off, access is allowed to all services. Note also that if you are using a PPP connection and your machine is not connected, or if for any other reason your machine does not have an IP address, Self-test will simulate an access attempt from an IP address of 127.0.0.1.
DoorStop is shipped as an evaluation version. It uses a serial number mechanism to easily convert eval versions to paid-for versions and to prevent unauthorized duplication of the software. Eval versions will stop working 10 days after the date they are first run. Until expiration, an eval version has all the functionality of a full working version. An eval version of DoorStop can be converted to a full working version by giving it a valid serial number.
When an unexpired eval version of DoorStop Admin is launched, a dialog appears with the options "Purchase", "Enter Serial Number..." and "OK". Clicking "OK" lets you run the software as an eval version. Clicking "Purchase" will cause your Web browser to go to Open Door's DoorStop order page. Clicking "Enter Serial Number..." brings up a dialog which allows you to enter a serial number and convert the software into a full working version. Enter the serial number you were provided when you paid for the product and click OK.
When an expired eval version is launched, a dialog appears with the options "Purchase", "Enter Serial Number..." and "Quit". To purchase a serial number, click the "Purchase" button to go to Open Door's order page. To obtain a lost serial number, send us email. To convert an expired version into a full working version, click "Enter Serial Number...", enter a serial number and click OK.
The "Enter Serial Number..." dialog can also be brought up any time DoorStop Admin is running. Choose "Register Serial Number..." from the File menu, and proceed as described above.
On OS 8.5 and later, the DoorStop Control Strip module provides a convenient way to see if DoorStop protection is active, and to control DoorStop. Display the Control Strip module's menu by clicking on the module. The module and its menu appear as shown below in Figure 11.

Figure 11. Control Strip menu
With the module you can
What Clients Will See
If an access attempt is denied by DoorStop, the error message displayed on the client will depend on the client application being used. In general the error message will be the same as if the client attempted to connect to a machine on which the desired service was not actually running. For instance the AppleShare client will display the message "No response from server" and a Web browser will display an error message such as "The server may not be accepting connections".
Online Help
Online help is available in two ways:
Either method will invoke DoorStop's online help, which is structured much like this user guide.
Mac OS 9 and Multiple Users
When running DoorStop Personal in Mac OS 9's Multiple Users environment, all users share the same preferences file and log file. These files are stored in the System Folder's Preferences folder.
If a user is set up as a Normal User, they will be able to change DoorStop's configuration, and those changes will affect all other users. It is therefore recommended that all users be set up as Limited Users, and denied access to DoorStop Personal Admin. In this way, only the Owner will be able to configure DoorStop.
![]() Back to Table of Contents
Back to Table of Contents
![]() Back to DoorStop Basics
Back to DoorStop Basics
![]() Forward to Using DoorStop - Advanced Mode
Forward to Using DoorStop - Advanced Mode