
Envision
the new way to experience the Web
User's Guide - Getting Started
Envision
the new way to experience the Web
User's Guide - Getting Started
System requirements
When you download Envision from the Envision download site, an Envision folder is automatically installed on your hard drive, and the installer file is then moved to the trash. Drag the Envision folder to the Applications folder. Further installation issues are discussed in the Appendix.
Purchasing Envision
The Envision demo is a fully functional copy of Envision that runs for 30 days from the time it is first launched. It can be downloaded for free from the Open Door Networks Envision download site. To continue using Envision past the 30 day trial period, you must purchase a serial number and enter that serial number into the demo. You can purchase a serial number in one of two ways:
Entering a serial number
Once you've purchased a serial number for Envision, you need to enter it into the demo. You can do this in one of two ways
The Welcome show
The first time you double-click the Envision application, it will automatically run a Welcome show. You can control this show just like any other show, and can close it once you've viewed it. If you run Envision the first time by double-clicking a demo show, Envision will not run the Welcome show, but will the first time you double-click the Envision application.
Getting started
Envision ships with over 1,000 pre-built Web show files, organized into groups by topic, highlighting many of the best "sights" of the Web. If you use our iEnvision app on the iPhone, you'll recognize that these groups and shows are quite similar to the ones included with that product. To familiarize yourself with Envision you may wish to first run some of these shows, located in the Web shows folder within the Envision folder. Just double-click a show to run it. If you watch the demos, you'll also want to read Watching a show in order to make the most of the experience.
A second option is to go directly to the reference sections of this User's Guide and start playing with Envision. The chapters of interest are
A third option is to use the tutorial below to create a simple show of your own, and then use that show to explore Envision.
Online help
Envision's Help menu provides access to onlibe help for both Envision and iEnvision, and the Web site for each product.

choose Envision Help.
Tutorial
In this mini-tutorial we'll make a simple Web show. We'll run it, pause it, and do some simple navigation within the show. At the end, we'll refer you to more advanced material.
The first step in making a show is, of course, to find a site with lots of interesting images. Probably the best way to find such a site is to use your Web browser to go to your favorite search engine and look for subjects of interest to you, throwing in the terms "photograph", "image" or "gallery", or similar terms. For example, if you're interested in astronomy, you might search for "astronomy" and "picture", in which case one of the sites you'd find would be NASA's Astronomy Picture of the Day (APOD) site, at http://antwrp.gsfc.nasa.gov/apod/astropix.html. As you explore this site, you'll notice that there are many, many high quality images.
Now that you've found an interesting site using your Web browser, you can make a basic Web show. Start by getting the URL (Web address) of the page of greatest interest. For example, there may be a separate page for a gallery of images, in which case you'd use the URL to that page, rather than the main page. In the case of APOD, if you wanted a show with the largest number of images, you might choose the archive page at http://antwrp.gsfc.nasa.gov/apod/archivepix.html; if you wanted just images of Jupiter, you could choose the Jupiter page at http://antwrp.gsfc.nasa.gov/apod/jupiter.html.
Let's assume that you want to use the large gallery. Either launch Envision or, if it's already running, choose New from the File menu. The main Envision window appears as shown below in Figure 1.
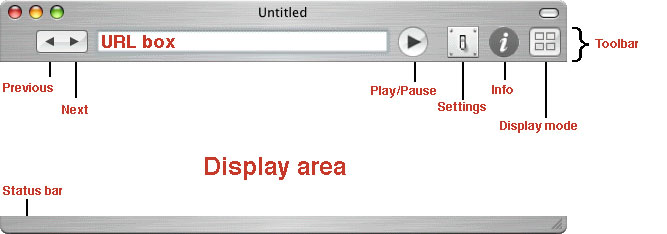
Figure 1. Envision main window
The elements of the main window are:
In the URL box, paste the URL http://antwrp.gsfc.nasa.gov/apod/archivepix.html and hit Return. A Web show using default settings will begin to play. Envision will retrieve images, starting at the URL you entered, and display them consecutively, with 10 seconds per image. If you want to save this show, choose Save from the File menu and specify a file name and location on your hard drive to save the file. Next time you want to see this show, you have only to double-click the file you just saved. To publish a show for use by iEnvision on the iPhone or iPod touch, see Saving shows for iEnvision.
To stop the show, either
The show pauses, the Pause icon becomes a Play icon and the Pause menu item becomes Play. If, while the show is paused, you want to look at images previously displayed, use the Previous button in the toolbar, select Previous from the Show menu, or use the back arrow key. If you want to manually advance the show to the next image, use the Next button, select Next from the Show menu, or use the forward arrow key. To resume the show, hit the Play button again.
Now that you've made a simple show, you may want to explore how to customize shows, by controlling show content and a show's appearance. The following sections should prove useful.

