
Figure 1. Gateway Status Window
The Gateway Status window contains useful information about the status of ShareWay IP, as well as access to other ShareWay windows. The status window is brought up by selecting "Gateway Status" from the Windows menu, and appears as shown below in Figure 1.

Figure 1. Gateway Status Window
The Status section of this window contains several pieces of useful data about the gateway:
Each element in the activity graph shows the number of logins made and the total number of bytes transferred within the time represented by that graph element. A graph element's period varies depending on the overall period of the graph. The graph's overall period (duration) is set using the Duration popup menu immediately below the graph. The graph's duration is labeled at the lower left and lower right of the graph. Graph element times as a function of graph duration are shown below in Figure 2. Each time ShareWay IP is launched, the graph starts out empty.
|
|
|
|
|
|
|
|
|
|
|
|
|
|
|
|
|
|
|
|
|
|
|
|
|
|
|
|
|
|
|
|
|
|
|
|
Figure 2. Graph Element Width vs Graph Duration
In addition, the Start/Stop button that turns the gateway on and off is located in this section of the status window. Once you have selected a target server (see the next section), you can start ShareWay IP by clicking the "Start" button. No servers will be accessible over TCP/IP until ShareWay IP has been started.
The contents of the status window can be hidden by clicking the disclosure triangle at the top left of the window.
NOTE: The Gateway can be run on the same machine as an AppleShare 4 server with AppleTalk multihoming enabled. As in other configurations, the Gateway will connect to the server using the primary AppleTalk interface.
Selecting new target servers is as simple as:
Start by selecting "Target Servers" from the Windows menu. The "Target Servers" dialog appears as shown below in Figure 3. The red "X" at the window's top right indicates that the Gateway is inactive.
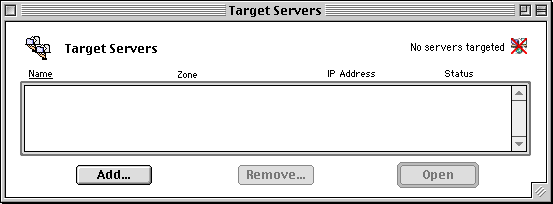
Figure 3. "Target Servers" Dialog
The scrolling list, initially empty, shows all selected servers and information (see Changing Parameters of a Target Server for details) relating to each of them. To add a target server, click the "Add..." button to bring up the "Add Target Server" window shown below in Figure 4.
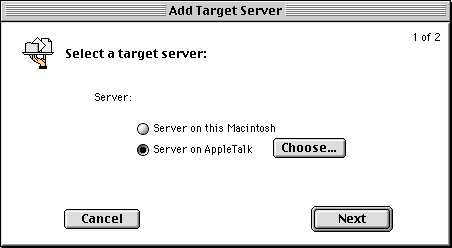
Figure 4. "Add Target Servers" Window
You can choose to target a server on the ShareWay Macintosh, or any server connected to the ShareWay Macintosh via AppleTalk.
Server on this Macintosh - ShareWay IP will communicate with the AFP server on the same Macintosh as ShareWay IP. This Macintosh does not have to be connected to an AppleTalk network, but AppleTalk must be active. If you wish to target the server on the ShareWay Macintosh, click "Server on this Macintosh" and then click "Next." The IP address dialog will appear in one of two forms. See Target Server IP Address Dialog below. This feature is equivalent to Mac OS 9's File Sharing over IP, implemented through the File Sharing Control Panel's "File Sharing over TCP/IP" check box. Only one or the other should be used.
Server on AppleTalk - ShareWay IP will communicate with an AFP server on the AppleTalk network or an interconnected AppleTalk network. If you wish to target a server on AppleTalk, click "Server on AppleTalk" and then click "Choose...". The Window shown below in Figure 5. appears.
Figure 5. Select a Server on AppleTalk
Select a zone, if any are present, then select a server and click "OK," or double-click a server. The IP Address dialog will then be displayed in one of two forms. See the next section.
When a server has been selected, the target server IP address window appears in one of two forms. The dialog shown in Figure 7 appears only if the ShareWay Macintosh is running Mac OS 8.1 or later and multiple IP addresses are implemented (see the Multiple IP Address Appendix for details). Otherwise, the dialog shown in Figure 6 will appear.
Port numbers only - This form of the dialog is shown below.
Figure 6. Target Server IP Address Dialog Without Multiple IP Addresses
Without multiple IP addresses, ShareWay uses the IP address of the ShareWay machine. This same IP address is used for all target servers. Servers are distinguished by using different port numbers. The range of valid port numbers is 1 to 65535, and the default is 548. It is recommended that non-default port numbers used for ShareWay IP be 8548 or higher, although anything over 1024 should almost always be available. When ShareWay is activated on a particular port it will check to determine if that port is already in use. Enter the desired port number (or leave it blank to use the default). The Access radio buttons below the port number text box determine whether server connections will be enabled or disabled when the server is added to the target server list. The default is "Enabled". When finished, click Done.
Note that if you are running Mac OS 9 on the ShareWay machine and wish to also use the OS's built-in File Sharing over IP, you must use alternate port numbers, secondary IP addresses (covered next), or both, for all servers targeted by ShareWay IP Pro.Port numbers and multiple IP address - This form of the dialog is shown below.
Figure 7. Target Server IP Address Dialog With Multiple IP Addresses
In this scenario, multiple IP addresses are available on the ShareWay machine, as configured in the file "IP Secondary Addresses" in the Preferences folder (see the Multiple IP Address Appendix). If the addresses in the list are not what you want, quit ShareWay IP, reconfigure "IP Secondary Addresses", restart the machine and relaunch ShareWay IP.
This form of the dialog also presents the option of changing the port number, giving even more flexibility to choosing an IP address for a target server.
The IP address preceded by a bullet is the machine's primary IP address, as configured in the TCP/IP control panel. The radio buttons below the list control whether all configured IP addresses are displayed, or only those that are unused. If you intend to use a unique IP address for each target server, then "Unused" (the default) will be more convenient for you. If you intend to use an IP address for several target servers, using port numbers to differentiate them, then you must select "All."
Choose an IP address from the list and enter a port (if desired). The range of valid port numbers is 1 to 65535, and the default is 548. It is recommended that non-default port numbers used for ShareWay IP be 8548 or higher. The Access radio buttons below the port number text box determine whether server connections will be enabled or disabled when the server is added to the target server list. The default is "Enabled". When finished, click Done.
Note that if you are running Mac OS 9 on the ShareWay machine and wish to also use the OS's built-in File Sharing over IP, you must use secondary IP addresses, alternate port numbers (covered above in Port numbers only), or both, for all servers targeted by ShareWay IP Pro.
Once target servers have been specified, the Gateway must be started
for the servers to be accessible from a TCP/IP network: To start
the Gateway, click the Start button in the Gateway Status window.
Servers will be made inaccessible again by clicking the "Stop"
button, quitting ShareWay IP, or shutting down the Macintosh where
ShareWay IP is installed. If users are connected to ShareWay IP's
targeted servers when you attempt to stop or quit ShareWay IP,
you will be warned that there are users connected and asked to
confirm your choice. If you are running Mac OS 8.5 or later, all
target servers will be made accessible through SLP as soon as
the Gateway has been started, and will be made unavailable once
the Gateway has stopped.
For a given target server, you can
From the Window menu, select "Target Servers." The "Target Servers" window appears as shown below in Figure 8.

Figure 8. Target Servers Window
The scrolling list shows all currently selected target servers. For each server, you can see
The list is sorted, by default, on server name, but can be resorted on any column by clicking the column's heading. The column used for sorting is underlined.
To change a server's characteristics, select it in the list and click "Open," or double-click it in the list. The server info dialog appears as shown below in Figure 9.
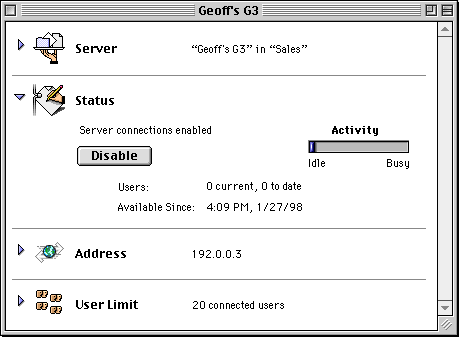
Figure 9. Target Server Info Dialog
Notice that each pane has a disclosure triangle at the top left. Clicking this triangle will toggle the pane between being shown and hidden.
To enable or disable connections to a target server, simply click the Enable/Disable button in the Status section of the window. This section also displays:
Changing the IP address and/or port number that ShareWay IP associates with a server is done in the Address section of the Target Server Info window. This section also displays the server's current IP address and port number (if non-default) and its AFP URL (access via this URL can be made through Open Door's AFP Engage!, which greatly simplifies client access to target servers). To change the server's IP address or port number, click the "Change..." button. This button will be disabled if server connections are enabled (see the paragraph above). Clicking this button brings up a dialog similar to the Target Server IP Address Dialog documented above. Choose the desired IP address (if multiple IP addresses are implemented -- see above) and/or port number.
The limit on the number of users allowed to connect simultaneously to a server can be changed in the "User Limit" section. The default is 20, the maximum is 120, and the minimum is 0, which makes the server inaccessible. The number is changed by using the up and down arrows on the "Maximum Connected Users" control. Connections must be disabled to change this number.
Changing a Target Server for a Particular IP Address
The section above describes how to change parameters (such as IP address) associated with a given target server. This section describes how to change the target server associated with a particular IP address. You might need to do this if a target server is renamed or moved to a different zone.
To do this, bring up the server window by double-clicking the server in the Target Servers window. See Figure 10 below. The server's IP address is displayed in the Address pane of the server window. Disable the server if it is enabled (see Changing Parameters of a Target Server above), and open the Server pane at the top of the window if it is not already open. Select the new server you wish to have associated with the IP address displayed in the Address pane. The controls for choosing a new server work the same as described in Adding Target Servers above. The server you select will have the same IP address (and the same user limit) as the previous target server.
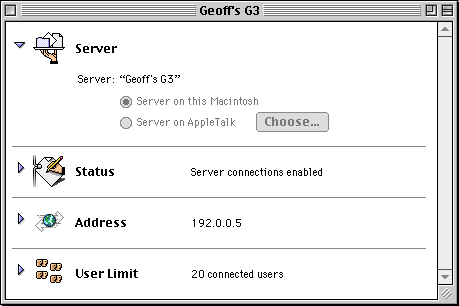
Figure 10. Target Server Info Dialog
Current connections can be monitored with the "Connected Users" dialog. From the Windows menu, select "Connected Users." The dialog appears as shown below in Figure 11.
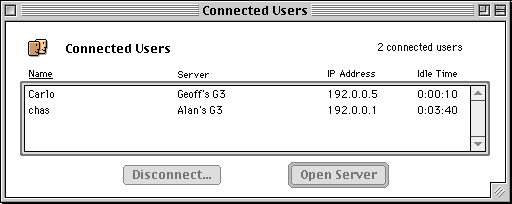
Figure 11. Connected Users Dialog
The scrolling list displays all currently connected users, showing:
The list is, by default, sorted by user name, but can be sorted using any column by clicking on that column's heading. The heading is underlined for the column used for sorting.
It is possible to force the disconnection of a user by selecting that user in the list, and clicking the "Disconnect..." button. You can open the server window for the server a particular user is connected to by selecting that user and clicking the "Open Server" button or by double-clicking the user.
ShareWay IP Professional provides two forms of real-time activity display:
See Figure 12 below.

Figure 12. Gateway Activity
See Figure 13 below.

Figure 13. Server Activity
In addition to making targeted servers accessible though SLP on systems running Mac OS 8.5 or later, ShareWay IP Pro can act as an SLP proxy for IP-based AFP servers which may or may not be accessible over AppleTalk. Such servers can be on an intranet, or on the Internet itself. Proxied-for servers will be easily accessible through an SLP-based application like AFP Engage! even though they don't support AFP Engage! directly. Examples of such servers include:
To proxy for a server, choose "SLP Proxies" from the Windows menu. The SLP Proxies window appears as shown in Figure 14 below.

Figure 14. SLP Proxies Window
Click the "Add..." button to bring up the SLP Proxy window, as shown below in Figure 15.

Figure 15. SLP Proxy Window
Enter the IP address or host name of the server to be proxied for. If the server uses a nonstandard port you must enter the port number as well -- otherwise leave the port field blank. If you click OK at this point (without entering an SLP proxy name), ShareWay IP will attempt to contact the server to determine the name to use. If contact is made, ShareWay will get the server's name and register the server with SLP using that name. If ShareWay cannot contact the server, you will be prompted to enter an SLP proxy name -- any name will do, up to 32 characters in length. The SLP proxy name is the name that shows up in client-side applications like AFP Engage!, and should thus uniquely identify the server.
If you wish ShareWay to proxy for a server with a name different than the server's name, enter the server's host name or IP address, the port number if nonstandard, the SLP proxy name you want to use, and then click OK. If the server cannot be contacted, you will be asked to confirm that you want to proxy for the server anyway. In this way, it is possible to proxy for servers not currently accessible.
As proxied servers are added, they appear in the list in the SLP Proxies window. The list can be sorted on any of the three columns by clicking on the column header. The column currently used for sorting has its header underlined.
To change the SLP proxy name (or other information) used for a server, select that server in the SLP Proxies window's list and click "Edit..." (or double-click the list item). Make the required changes and click OK. ShareWay will deregister the old URL with SLP and register the new URL. The new URL may not show up in AFP Engage!'s Browse window right away, since AFP Engage! only queries SLP periodically.
To delete a proxied-for server, select that server in the SLP Proxies window's list and click "Remove...". ShareWay will remove the server's entry from its list and deregister that server's URL. The URL may continue to show up in AFP Engage!'s Browse window for a short time, since AFP Engage! only queries SLP periodically.
ShareWay IP queries each proxied server periodically to confirm that servers are still available, or to see if unavailable servers have become available. Only available servers are registered with SLP by ShareWay IP -- unavailable servers are deregistered until they again become available. In general, ShareWay IP will only register servers that can actually be connected to through IP. Available servers are marked as "available" and unavailable servers as "not available". Servers are queried once every 30 minutes. To have a server queried at any time, select the server, click "Edit..." and then OK. Stopping the Gateway causes all servers to be marked as "disabled".
![]() Back to Table of Contents
Back to Table of Contents
![]() Back to Basics
Back to Basics
![]() Forward to Other Features
Forward to Other Features